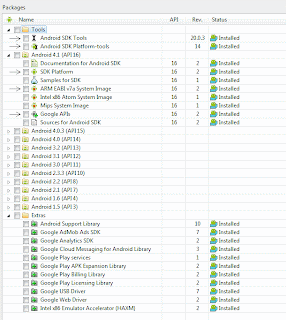
First of all you need the Android SDK to get going. Download the relevant version for your platform. Currently it supoprts Windows, Linux and Mac. All right, got it done? Awesome, lets see the minimum you need to get started. Note that when you run the installer you will be presented with the following screen;
 |
| Android SDK Manager |
Got everything installed? Great, now lets set up our eclipse platform to start creating awesome android applications. Note that you require Eclipse 3.6 or higher to get the ADT ( Android Development Tools) plugin to work.
Go to install new software and add the location of the ADT plugin which is http://dl-ssl.google.com/android/eclipse . You only need to download the Developer tools from the ADT plugin because you will only need the NDK in a few instances. The NDK is the native development kit which allows you to program at a lower level using C language specifics. This post will only focus on the Android SDK.
So once you get that done you are ready to roll my friend. Before that i would like to mention a few things that are available to you after installing the Android SDK. You will have the SDK Manager and the AVD manager. The SDK manager will show any tools or APIs you need to download and you can use this tool to upgrade you environment as and when you need. We will get to the AVD manager when we look at the sample application.
In Eclipse, go to New->Other->Android->Android Application Project and follow the steps. Note that in the first screen you will have an option to specify the minimum required SDK. This signifies the minimum android SDK your application needs to run. Select the option "Create Activity" and select the blank activity option. Give it a name and finish off the application creation process.
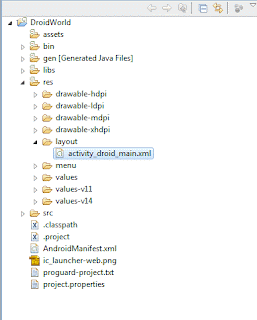
Now you will be presented with a structure as follows;
Lets take a look at what each folder is for.
assets : any property file, databases, text files or the sort which you want to bundle up with your application can be put here. This can have its own folder hierarchy within it self and you can read those files in the usual way you do file reading in java.
bin : contains the various files built by the ADT plugin. It will contain the .apk(Android application package file)
gen : this folder contains mainly two files that are compiler generated. Which are R.java & BuildConfig.java. I will explain more about he R.java in a bit. It is best not to edit these files as these are anyway generated on each build.
libs : Contains the android jar that exposes the android APIs required for development. Note that in our application it uses the android-support-v4.jar which is the support version library that allows you to use newer APIs whilst having support for older Android Operating systems.
res : this folder contains all the resources required by your application such as images etc. You can categorize according to various screen resolutions, languages and OS versions. The layout folder will contain the XML file that allows you to define your UI element specific to your activity. The values folder allows you to define language entries in such a way we use .properties files in normal java applications to support different languages. More information can be found here.
src : contains the source files of your project.
AndroidManifest.xml : The manifest will define the name of the application, icon to be displayed, the various activities used, Permissions required etc. The version code is set to "1" initially. This code is used to determine whether your application has an upgrade available or not. Best practice is to increment the value on each release.
Within the manifest you can see an entry such as android.intent.action.MAIN. This signifies that the activity we just created is the main entry point of the application ( such as the main method in a java program).
R.java : This file is automatically generated and it is recommended that you do not change this file manually because anyway when you do any changes in your project, ADT will generate this file. This file provides access to the resources in your application in a programmatic way so that you can access your resources in a unified manner.
Let us open the blank activity that we just created. Ok the app here does not do much. But i just wanted to introduce the various elements that make up an android application and to jump start development. Within this sample what i show is how to call another activity from your main activity.
Let us first see the xml file pertaining to my main activity.
<RelativeLayout xmlns:android="http://schemas.android.com/apk/res/android"
    xmlns:tools="http://schemas.android.com/tools"
    android:layout_width="match_parent"
    android:layout_height="match_parent" >

    <Button
        android:id="@+id/button1"
        android:layout_width="wrap_content"
        android:layout_height="wrap_content"
        android:layout_alignParentLeft="true"
        android:layout_alignParentTop="true"
        android:layout_marginLeft="107dp"
        android:layout_marginTop="134dp"
        android:text="@string/next_activity_btn_name"
        android:onClick="actClick"/>

</RelativeLayout>
As you can see nothing major here. Just one button which i have defined. The name of the button is defined in the strings.xml in order to make the application localization friendly. Also i have defined an onclick functionality. Let us see how the onClick method is implemented in my main activity;
package com.example.droidworld;

import android.os.Bundle;
import android.app.Activity;
import android.content.Intent;
import android.view.Menu;
import android.view.View;

public class DroidMainActivity extends Activity {

 @Override
 public void onCreate(Bundle savedInstanceState) {
  super.onCreate(savedInstanceState);
  setContentView(R.layout.activity_droid_main);
 }

 @Override
 public boolean onCreateOptionsMenu(Menu menu) {
  getMenuInflater().inflate(R.menu.activity_droid_main, menu);
  return true;
 }

 public void actClick(View view) {
  startActivity(new Intent("com.example.droidworld.NextActivity"));
 }
}
You can see that the name of the on click method is the same as what i defined in the XML file. Also the method takes on the View class as a parameter. Within this i use the method startActivity() which enables us to call another activity. Any name can be given here which should correspond to the name given in our application's manifest.xml file. Let us see how we have defined this in our manifest;
    <activity
            android:name=".NextActivity"
            android:label="@string/title_activity_next" >
            <intent-filter>
                <action android:name="com.example.droidworld.NextActivity" />

                <category android:name="android.intent.category.DEFAULT" />
            </intent-filter>
        </activity>
Within the intent filter tags, the name given for the attribute android:name should correspond with the name given within our Intent() method within the startActivity method call. android.intent.category.DEFAULT allows another activity to call this activity. You can also get away by not defining intent filters if the activity you are going to call is within your own project. If that is the case then you call the activity directly as such;
startActivity(new Intent(this, NextActivity.class));
One thing to note here is that if you want to expose your activity to other applications, then you need to expose it using intent-filters.
That about winds up the introduction to the droid world. I myself am pretty new to this, so if you believe some of what i said in this post is invalid or requires changes, please do leave by a comment which is much appreciated.
You can download the sample project from here. You just need to do a Run->Android Application and you are good to go. Make sure to set up an AVD manager before running the application. The AVD manager creates the emulator on which your application is deployed. Create an instance by going to Windows->AVD Manager. The rest is intuitive so i will not go into detail. If you have any issues please do let me know and i will be glad to help.
I will follow up this post with a few other articles to depict various features available.
Thank you for reading and have a good day. And from words of the Terminator "Hasta la vista "
Cheers!!
